
Posted by Daniel Holden on 11 December 2023
Tags: AWS, EKS, Kubernetes, Linux
Lazy pulling, also known as on-demand image pulling, is a strategy used in containerisation to optimise the way container images are retrieved and stored. In a typical container deployment, the entire container image is pulled from a container registry and stored locally on the host system before a container is launched. Lazy pulling, however, allows for the image to be pulled partially and defers the image retrieval until it is actually needed, rather than fetching and storing images upfront.
Lazy pulling is a valuable feature in container orchestration systems like Kubernetes, where it can help optimise resource usage, speed up container launch times, and improve the overall efficiency of container deployments, especially in large-scale and distributed environments.
Whilst developing Scalable Pixel Streaming, TensorWorks needed a way to reduce the startup time for Unreal Engine containers in the cloud. This blog post will explain how we added Nydus on our AWS EKS cluster to enable lazy pulling of container images.
Contents
- Introduction to Nydus
- Installing Nydus onto a Linux EKS worker node
- Using Packer to build the AMI
- Using the custom AMI
- Deploying your workload
- Performance results when used with Scalable Pixel Streaming
- Conclusion
Introduction to Nydus
Nydus is a powerful open-source file system solution that employs the Registry Acceleration File System (RAFS) format to implement a content-addressable file system. This innovative approach enhances the existing OCI image specification, resulting in improvements across container launch speed, image space utilisation, network bandwidth efficiency, and data integrity. Nydus enables the creation of a highly efficient image distribution system for Cloud Native workloads, covering container images, software packages, and a wide range of other resources.
Nydus Snapshotter
The Nydus Snapshotter is a component of the Nydus project, designed to enhance container image handling and improve efficiency in container runtimes like containerd. Specifically, the Nydus Snapshotter implements the chunk-based content-addressable file system via the use of a containerd proxy plugin.
Nydus Image Service
The Nydus Image Service is a component of the Nydus project, designed to support the Nydus Snapshotter. The proxy plugin that is installed as part of the Nydus Snapshotter will start the Nydus user-space daemon nydusd automatically when the Nydus container format is recognised. To convert container images into the Nydus format, you can utilise the nydusify conversion tool. Converting base images is straightforward; you can do this by specifying the source OCI image in a repository and setting the target Nydus image as follows:
nydusify convert \
  --source myregistry/repo:tag \
  --target myregistry/repo:tag-nydus
This command will convert the source image (located in the myregistry/repo:tag repository) into the Nydus format and save it as myregistry/repo:tag-nydus.
](/assets/images/blog/launch-containers-faster-by-enabling-lazy-pulling-on-eks-with-nydus/perf.jpg)
Installing Nydus onto a Linux EKS worker node
To get the benefits of what Nydus has to offer, you need to create an Amazon Machine Image (AMI) that has the Nydus Snapshotter installed and configured correctly. We will explain how to deploy the following Nydus components to a custom AWS AMI:
- Nydus Snapshotter (v0.10.0)
- Nydus Daemon (nydusd v2.2.2)
- Nydus Image (nydus-image v2.2.2)
We will also explain how to configure containerd to use the Nydus Snapshotter and the proxy plugin containerd-nydus-grpc with support for Kubernetes.
Note:
All steps and instructions throughout this article are intended to be performed in a Linux environment.
Download and build Nydus
First and foremost, you must ensure that the worker node possesses the essential tools for the tasks ahead. This involves installing Git for cloning the Nydus repository, as well as Go for building and installing the Nydus Snapshotter.
Create an executable bash script following the steps below, and save it to your home directory for later use with Packer provisioners, e.g: ~/nydus.sh
Note:
The Linux EKS worker nodes are running under Amazon Linux 2, which uses the yum package manager.
Step 1: Install Git and Go:
yum install -y git go
Step 2: Clone and Install the Nydus Snapshotter onto the worker node:
git clone https://github.com/containerd/nydus-snapshotter.git -b v0.10.0
cd nydus-snapshotter
make
make install
cd ..
Step 3: Download and Extract the Nydus Daemon.
Ensure the Nydus Daemon is installed and accessible within the worker node’s PATH, as it is essential for the Nydus Snapshotter to launch daemon instances as required:
wget https://github.com/dragonflyoss/image-service/releases/download/v2.2.2/nydus-static-v2.2.2-linux-amd64.tgz
tar -xf nydus-static-v2.2.2-linux-amd64.tgz
Step 4: Move Nydus Daemon Binaries to the PATH:
mv nydus-static/nydusd /usr/local/bin/nydusd
mv nydus-static/nydus-image /usr/local/bin/nydus-image
Modify EKS bootstrap script
A typical EKS bootstrap script is a shell script or a set of commands that are executed on the worker nodes in your EKS cluster as part of their initialisation. These scripts are used to prepare the worker nodes for joining the EKS cluster and can include various tasks.
As part of the Nydus installation process, you must include the required entries below at the end of the EKS bootstrap script. This will modify the containerd configuration file to use the Nydus proxy plugin and the Nydus Snapshotter.
The reason this is added to the EKS bootstrap script instead of simply adjusting the containerd configuration directly, is because the default EKS bootstrap script makes its own modifications to the containerd configuration file that would otherwise overwrite any changes made when the worker node is initialised.
cat << EOF >> /etc/eks/bootstrap.sh

# Add Nydus proxy plugin configuration to the containerd config file
# NOTE: This uses containerd config version 1, which is the AWS default
cat << EOF2 >> /etc/containerd/config.toml

[proxy_plugins]
  [proxy_plugins.nydus]
    type = "snapshot"
    address = "/run/containerd-nydus/containerd-nydus-grpc.sock"

[plugins.cri.containerd]
   snapshotter = "nydus"
   disable_snapshot_annotations = false
EOF2

# Restart the containerd service
systemctl restart containerd
EOF
Using Packer to build the AMI
Note:
Ensure you have Packer configured on your local machine, as it will be used to build the custom AMI.
Packer is a popular open-source tool for creating machine images, also known as Amazon Machine Images (AMIs) when used with AWS. Packer allows you to automate the process of creating custom machine images for AWS. This is useful for ensuring consistency and repeatability when deploying virtual machines.
If you would like to learn more about Packer and how it can be used to build AMIs see this article.
Packer template
The Packer template defines the parameters and settings required to build and provision a machine image that meets specific requirements and standards.
The key components and elements of a Packer template file include:
-
Builders: Builders define the source platform or infrastructure where the machine image will be created. For example, you can specify AWS, VirtualBox, or VMware as the target platform. Each builder has its own set of configuration options.
-
Provisioners: Provisioners are responsible for configuring and customising the machine image after it is launched. You can use provisioners to install software, execute scripts, or make other modifications to the image. Common provisioners include shell scripts, Ansible, Chef, and Puppet.
-
Variables: Packer templates can include variables to parameterise your configurations making your templates reusable and flexible. Variables can be set in the template or provided at runtime.
-
User Variables: User variables are a type of variable that allows users to provide values when running Packer. This is useful for overriding default values specified in the template.
Save the following file as ~/eks-gpu-nydus-ami.json:
{
    "variables": {
        "instance_size": "g4dn.xlarge",
        "ami_name": "eks-gpu-worker-linux-nydus-1.26-v1",
        "base_ami": "ami-09a8aa1637a418cec",
        "ami_region": "ap-southeast-2",
        "ssh_username": "ec2-user"
    },
    "builders": [
        {
            "type": "amazon-ebs",
            "region": "{{user `ami_region`}}",
            "source_ami": "{{user `base_ami`}}",
            "instance_type": "{{user `instance_size`}}",
            "ssh_username": "{{user `ssh_username`}}",
            "ssh_timeout": "20m",
            "ami_name": "{{user `ami_name`}}",
            "ssh_pty": "true",
            "tags": {
                "Name": "{{user `ami_name`}}",
                "BuiltBy": "Packer"
            }
        }
    ],
    "description": "EKS GPU Worker node for EKS. Supports lazy pulling using Nydus Snapshotter v0.10.0",
    "provisioners": [
        {
            "type": "file",
            "source": "files/nydus.sh",
            "destination": "~/nydus.sh"
        },
        {
            "type": "shell",
            "inline": [
                "sudo bash ~/nydus.sh"
            ]
        }
    ]
}
There are some key items of note in the above template file, outlined in the variables component:
-
instance_size: The AWS EC2 instance type.
-
ami_name: The name of the AMI that this template will produce. This AMI name must be unique to the AWS account that you’re creating the AMI on.
-
base_ami: This is the AMI that you wish to modify to install the Nydus stack onto. In this case, the AMI is
ami-09a8aa1637a418cec, which is the EKS Kubernetes Worker AMI for Machine Learning Accelerated Workloads on AmazonLinux2 image (k8s: 1.26.6, containerd: 1.6.*). -
ami_region: The AWS region that your AMI will be deployed to.
Note:
The base_ami that is used must exist in the same region that is specified in the ami_region.
Also take note of the provisioners block. This is where the nydus.sh bash script you made in a previous step will be used. The bash script will be uploaded to the AMI and will run, installing the Nydus stack before AWS snapshots the AMI for use.
Authenticate to AWS
To prepare for AMI creation, ensure that your AWS credentials are accessible to Packer. These credentials should have permissions for managing EC2 instances.
To allow Packer to utilise your IAM user credentials, you should set your AWS access key ID as an environment variable:
export AWS_ACCESS_KEY_ID="<YOUR_AWS_ACCESS_KEY_ID>"
export AWS_SECRET_ACCESS_KEY="<YOUR_AWS_SECRET_ACCESS_KEY>"
Build with Packer
You can run the following Packer command to start the AMI build process:
packer build ~/eks-gpu-nydus-ami.json
Once done, the AMI will be available for use in the AWS console. You can then use this AMI for your own EKS cluster worker nodes and take advantage of lazy pulling.
Using the custom AMI
The process for consuming the custom AMI is the same whether you are creating a new EKS cluster or applying it to an existing EKS cluster.
You will need to create a new launch template or launch template version, then use that launch template for creating a new node group.
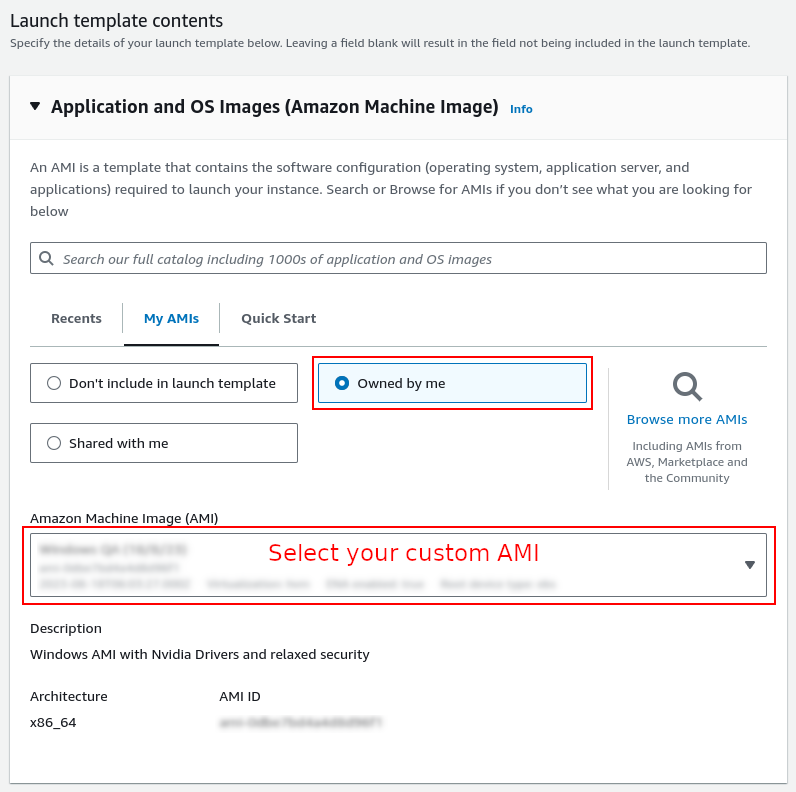
The launch template allows you to select the newly created AMI.
You will then need to select this launch template when you create your node groups for the EKS cluster. If you’re utilising an existing EKS cluster that is using managed node groups, unfortunately you will need to create new managed node groups in order to apply the new launch template.
Deploying your workload
Note:
The following steps assume you have already installed and configured kubectl and set up access to your EKS cluster and that you have a working Unreal Engine application container.
To deploy a workload to Kubernetes using kubectl, you’ll need to create a manifest file that describes your workload, then you can use kubectl commands to apply this manifest to your EKS cluster.
Step 1: Create a Kubernetes manifest file and save it as sps-workload.yaml, replacing {{ YOUR_CONTAINER_TAG_HERE }} with the container tag for your Unreal Engine application:
apiVersion: apps/v1
kind: Deployment
metadata:
  name: sps-workload
spec:
  replicas: 1
  selector:
    matchLabels:
      app: sps
  template:
    metadata:
      labels:
        app: sps
    spec:
      containers:
        - name: sps
          image: {{ YOUR_CONTAINER_TAG_HERE }}
Step 2: Apply the manifest to your EKS cluster using kubectl:
kubectl apply -f sps-workload.yaml
This command will create the deployment based on the configuration specified in the YAML file.
Step 3: Watch the deployment pods:
kubectl get pods --watch
The kubectl get pods --watch command will show the pods created by the deployment and update as the pod status’ change. This will allow you to observe how quickly your pod status will reach the Running status.
Performance results when used with Scalable Pixel Streaming
The results below show a significant improvement in reducing the time taken to initiate Unreal Engine application containers on EKS.
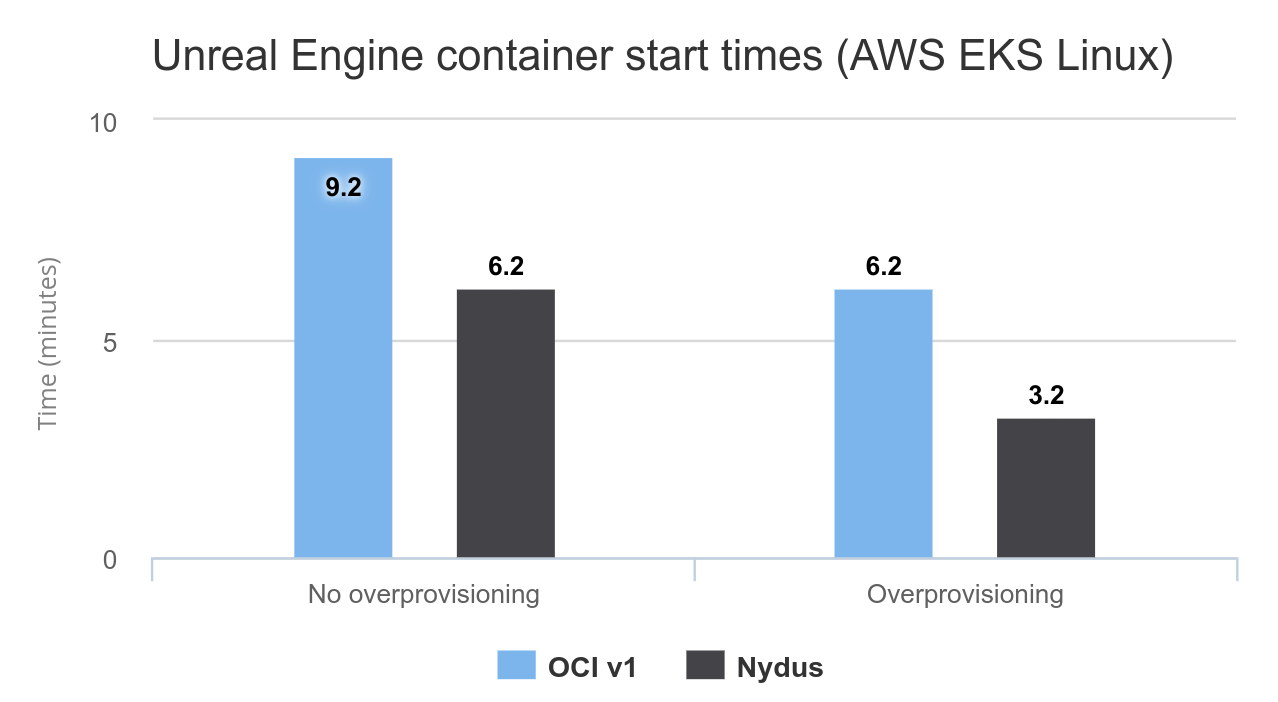
Note:
Startup times are averaged values of multiple container start-up runs with a node group size of 1. For the tests with overprovisioning enabled, the number of overprovisioned nodes was set to 1.
Note:
The average start up time for Linux GPU worker nodes on EKS is 3 minutes.
Conclusion
TensorWorks was able to improve load times on EKS for Unreal Engine applications using Scalable Pixel Streaming by up to 50% by employing the use of lazy pulling, whilst in some cases also decreasing the storage footprint of the container image. These results are impressive, given the simplicity of 1) enabling the Nydus Snapshotter for use with AWS EKS clusters; and 2) converting container images using the nydusify tool.